Tuesday, April 26, 2011

Just a quickie

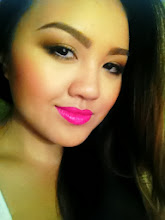
Hey guys, just a quick post for the look I did today going to work for MAC again. Love or leave it.. lol hahah jk!


Products I Used:

  • MAC E/S in Contrast on main lid
  • MAC E/S in Swish above crease as blending colour
  • MAC E/S in Shroom on brow bone
  • MAC E/S in Carbon in outter "V"
  • MAC blush in Bite of an Apple on cheeks
  • MAC L/S in Hug Me on Lips
  • Ardel lashes in Demi wispies
Have a lovely Tuesday EVERYONE! :D

Saturday, April 23, 2011

On-Call girl! :S MAC that is!

Hey ladies. Just wanted to show you guys my look for today going to work at MAC. Yes, I work for MAC on-call and they called me today for a shift!! YAY! It kinda sucks though because MAC doesn't train on-call employees O_O!! So I basically have to learn EVERYTHING on the job! It's seriously frustrating when you don't have any idea where all the products are and what everything is! And ALSO, you have to learn how to NOT crash the till! Yes...I almost crashed the MAC till today! I think the other girls thought I was a complete idiot... I definitely felt like it. Anywhoo, I got a lot of compliments from customers today about my look so I'm hoping you all will enjoy it too!


On the face:
  • MAC E/S Trax on main lid
  • MAC E/S Star Violet on outter V and crease
  • MAC E/S Carbon in crease
  • MAC E/S Gleam as blending color above crease
  • MAC E/S Vanilla in brow bone
  • MAC Fluidline as liner
  • Ardell lashes - demi wispies lashes
  • MAC mineralized blush (forget the name)
  • NYX lipliner in Beige
  • Revlon L/S in Soft Nude

Wednesday, April 6, 2011

Trouble putting on your falsies??

I recently bought these Kiss Premium Eyelashes with Applicator Strings at Walmart, thinking I'd try them out since they were featuring these new "applicator strings" that are supposed to help you get your falsies on easier and faster. Now, I thought this was a GREAT idea for those who find it hard to put on a pair of lashes! However, I wanted to try them first to see how well they really worked before I started telling all my friends about it.

I tried my best to take pictures of the steps to putting these lashes on. It was a bit of a fail so please, bare with me!

This is how the the packaging looks like when you first purchase it.


Instructions on how to put them on. Seems simple right?? lol


Close up of how the string is actually attached to the eyelashes.


Carefully take of the lashes from the packaging and apply the lash glue on the band just like any other lashes.


Take both strings and place the lashes as close as possible to your real lashes and you can also pull on each string to position the lashes to your liking.


At this point, you can carefully pull out the strings while holding down the edge of the lashes so it doesn't lift off....however, it is actually A LOT harder to do than said! As you guys can see in this photo, the lashes are lifted as a result of pulling out the string.


And pull out the other string again, while holding down the edge of the lash/


The end result!


In my opinion, I don't think the strings really do anything to help the process of putting on the eyelashes. In fact, when removing the inner corner string, it was actually pretty tough to get the string out and it even ended up lifting the lash from my lid. This product claims that it makes putting on lashes faster with the strings but, honestly, I can put on a pair of lashes with just my fingers or a pair of tweezers like nobody's business! lol However, if you are one of those who find difficulty in putting on a pair of falsies, this product might help make the process a little easier and help in learning how to properly place them on your lids. For me, I have been putting on lashes for years and I think I pretty much have the hang of it...if not by now, then I think we'd have a bit of an issue!! If anything, I just find that the process of using the strings and removing them takes more time than putting them on with a pair of tweezers. So, for an overall rating...I'd have to give this product a 5/10.

FYI - the lashes themselves are actually really great and come in lots of different styles. I'd probably only ever buy this product again solely for the lashes and remove the strings beforehand! Tata ladies!

Sunday, April 3, 2011

A quick outfit!!

My sister's 28th birthday dinner evening, that is!! I <3 H&M and this outfit seriously screams H&M! Basically because almost everything I'm wearing for this look is from H&M! I really didn't mean to do this on purpose, I just shop there A LOT! And mind you, all of the different items were mostly purchased at different times! Thank goodness for H&M!


Cropped pouffed shoulder blazer from H&M - I believe this blazer was around the $29.95 range CDN. I bought it about a year ago so I really don't remember. Hmmm...

The regular black tank from Costa Blanca - I bought this when Costa was having their 50% off EVERYTHING sale. So I believe it was about $4.00

Feather necklace from H&M bought recently for $9.95. CHEAP! :)

Pink and coral tiered mini skirt from H&M - bought it on sale the other day for $15 from $29.95. I just LOVE a great sale!

Black cage pumps from H&M - bought it for $34.95. It wasn't on sale but I loved these shoes and really could not pass them up as heels these days in Canada, really don't come cheaper than $35!!! (boo Canadian prices/taxes)!

My advice, H&M always has sales. If you wait, most likely the items you want WILL GO ON SALE!!!

Close up of my feather necklace!


Don't mind my chubbiness here, I just came back from eating a grilled sirloin steak with shrimp, crab and creamy mashed potatoes!!! lol By the end of the night, my skirt was cutting circulation to the bottom half of my body!


They look too big for me in this pic but their actually really supporting and super comfy! Not to mention, CUTE as well! lol hehe

Saturday, April 2, 2011

Dinair Airbrush Makeup foundation - Before and after!!!!

Hi guys! Okay, so, this is something that I have been meaning to do/show for a very long time now. About maybe six months now! Back in November, I had attended the IMATS, and for those who don't know what that is, it is the International Makeup Artist Trade Show! It is crazy awesome! Lots and lots of makeup companies come out to promote their products and sell them at a discounted price! Some companies, for example are, Makeup Forever, NYX, Crown Brush, Stila and so on. Basically, it's makeup HEAVEN!!! lol My main goal going to the IMATS this past year was to purchase the one and only Dinair Airbrush set! I know, there are other airbrush sets as well like OCC, Kett Cosmetics and Temptu Pro but I decided to go with Dinair because it IS the first company to introduce airbrush foundation and all I've only heard good reviews about their set. Also, Kandee Johnson recommended it and said was AWESOME! hehe lol. I also chose Dinair because their selling price was more in my price range compared to the other companies. Anyway, I've been practicing with it a lot and recently also had to order more foundations to have a better and wider range of shades for different skintones.

So, I just wanted to show you all a before and after shot of my best friend and AUNT, Tzong. She wasn't exactly happy with the idea that I'm posting this "before" picture but she did consent to it so please, these pictures are solely for the purpose of showing you the wonders of Dinair! lol I hope you all enjoy!


WHY DINAIR?
  • Flawless
  • Longlasting
  • Fast and easy
  • Light weight
  • Hypoallergenic
  • Non-comedogenic


The above picture is of the original kit I had bought at the IMATS which cost me $249.99 flat with no tax!


 This picture is of the extra foundations I purchase this past month because I needed some lighter colors in my kit. I think this was actually a special offer but I cannot, for the life of me, remember how much it actually cost..I think it was around the $45 range....Something like that! lol But here is the link if you guys wanna check out their site!  http://www.airbrushmakeup.com/

    I really do think that Dinair does meet everything that their airbrushing system does. However, I do find that it's not completely waterproof even though the company says that it is water resistant. It's great though for covering imperfections like red spots, acne and acne scars, under eye circles, liver spots, rosacea, birthmarks and so on. It's also great because you don't have to ever touch your face with any dirty fingers, brushes or sponges and it's super fast to set up, use and extremely easy to maintain and clean.

    This product is great for starting makeup artists as well as professional and anyone/everyone who wants an airbrushed flawless face and sees this product's worth! I must admit, it is quite expensive but I really do think this is worth it and is a great investment! Hope you guys enjoyed the pictures!!!!

    Also, it was my sisters birthday this past week and we decided to go out for a small dinner for her. Here's are some pics of our fun night!!


    Friday, April 1, 2011

    FOTD - Rainbow spring?? Kinda....not really? lol

    It's been a while and it's because my days have quite busy. On my days off from work, I've been babysitting my little cousins so I really haven't had much time to do anything makeup related! However, I did have this night to myself so, I thought, why not spend it playing with my makeup?! Basically, I was bored and this look is what I came up with. I'm really thinking I should start doing more wearable looks here on my blog. But whenever I sit in front of my vanity, all I want to do is use all my bright shadows and lipsticks! AAHHHH, I swear..color is my addiction and I just cannot stay away from it! I do promise to do a more wearable look soon! Enjoy!